 At its annual re:Invent conference recently, AWS announced AWS Transfer for SFTP. Don’t yawn and click away from this blog post just yet! 🙂
Despite years of attempts to retire inter-organization file transfers based on SFTP, the protocol is alive and well and continues to be deeply, deeply embedded in enterprises’ workflows. In the healthcare and finance industries, especially, the world might well come to an end without SFTP. And while there are some excellent SFTP servers out there (I’m a fan of Globalscape and worked at Ipswitch), there hasn’t been a true cloud offering until now.
Think of it: an sftp service that requires no physical or virtualized server infrastructure, features low cost usage-based pricing, offers nearly unlimited storage capability (via S3) with automatic archive to Glacier and which is integrated with a sophisticated identity system. Now add scalability and reliability and cloud integration like triggered Lambda workflows based on arrival of data. You can see why AWS’s entry into secure file transfer is of special importance to enterprises. AWS Transfer for SFTP may not have the glitz of some of AWS’s latest offerings but, trust me, it may have a more important impact on many enterprises’ migrations to the cloud and their ability to enhance their security in external communications than the products that gets headline attention at re:Invent and among tech journalists.
@jeffbarr, the most prolific explainer of AWS on the planet, has written an excellent tutorial for AWS SFTP. Jeff’s example describes how you could use AWS SFTP to isolate users into “home” directories but doesn’t actually have a detailed how-to for doing so. That’s the topic of this post, along with a couple of other hints. Building on Jeff’s post and the AWS SFTP documentation, I want to focus on the IAM setup required to direct individual users to a specific S3 “folder” in an S3 bucket. (S3 doesn’t really have folders — these are just objects in an bucket. But they can be made to look like a hierarchical file system, so must people think of and use them that way).
I also discuss how to set up a custom domain name in a delegated Route 53 subdomain. (This technique uses the concepts described in how to set up Route 53 DNS — the most popular post of all time on this blog.) Third, I describe how to set up AWS SFTP logging to CloudWatch.
I assume you already know how to set up S3 buckets, IAM users and groups, how to generate keys for sftp users and how to set up the keys in a transfer client and/or command line sftp client.
There’s quite a lot here to understand, especially about the IAM set up. Even though the IAM policy examples are lifted directly from the AWS SFTP documentation, I don’t think their illustrations and explanations are clear enough. So, I will take you step-by-step though setting up two users (sftpuser1 and sftpuser2) to access S3 home directories in a bucket (air11sftpbucket). Of course, we’ll set AWS SFTP up so that neither user is able to view or manipulate the other’s home directory.
If you remember only one thing from this post, it should be that your AWS SFTP Server must assume a role that gives it permissions to act on the bucket. In IAM, you don’t assign policies directly to AWS services. Instead, you assign the policies to roles that are account-number-specific and then establish which services may use the permissions in the policy attached to the role. This is called a “trust relationship.” Of course, you also have to provide the users in the group access to the bucket as well.
Let’s start with a picture of the IAM relationships for AWS SFTP that implements our simply two-user setup.
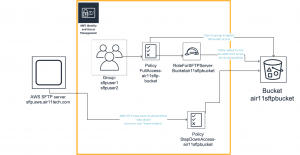
Let’s step through the IAM definitions from left to right (inside the orange outline). First we set up two users and add them to a group. I know you know how to do this, so I won’t be showing the IAM definitions for these two steps.
Next, you need to create a policy for full access to the bucket. Here’s the JSON you can use. Just be sure to change the name of your bucket in the Resource statements. GetBucketLocation and ListAllMyBuckets apply to console operations and so we allow all resources for them. Otherwise, this policy applies only to bucket air11sftpbucket and the objects within that bucket.
{
    "Version": "2012-10-17",
    "Statement": [
        {
            "Effect": "Allow",
            "Action": [
                "s3:GetBucketLocation",
                "s3:ListAllMyBuckets"
            ],
            "Resource": "*"
        },
        {
            "Effect": "Allow",
            "Action": [
                "s3:ListBucket"
            ],
            "Resource": [
                "arn:aws:s3:::air11sftpbucket"
            ]
        },
        {
            "Effect": "Allow",
            "Action": [
                "s3:PutObject",
                "s3:GetObject",
                "s3:DeleteObject"
            ],
            "Resource": [
                "arn:aws:s3:::air11sftpbucket/*"
            ]
        }
    ]
}
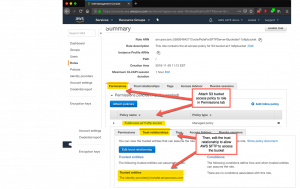
Next, you need to add this policy to a role and edit the trust relationship for the role so that it can be assigned to the AWS SFTP server. Here are screenshots of the role definition, the trust relationship and the JSON code to use for the trust relationship. (I nearly went crazy finding out the service name, so if this post does nothing else for you, there’s that. 🙂 ). Creating a role for the account with the AWS SFTP Server is a little tricky: In the console: select “Another AWS account” and specify this account’s account number.
{
  "Version": "2012-10-17",
  "Statement": [
    {
      "Effect": "Allow",
      "Principal": {
        "Service": "transfer.amazonaws.com"
      },
      "Action": "sts:AssumeRole",
      "Condition": {}
    }
  ]
}
Note that you have given the users in the group as well as the AWS SFTP server full access to the bucket, the latter gaining access via a role that allows the sftp server to assume the permissions in the policy. It’s confusing at first but makes (typically elegant AWS) sense if you think hard about it. Be sure to assign this role to the server in the AWS SFTP console.
But there’s an issue: we want the AWS Transfer for SFTP service to associate our users with their specific home directories (actually S3 objects). Our S3 bucket looks like this:
|--air11sftpbucket
   |--stfpuser1
   |--sftpuser2
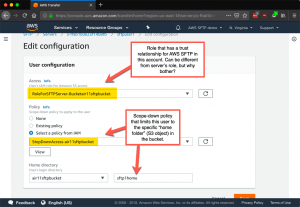
That means the role’s permissions for the AWS SFTP server are too broad. We need a policy that limits access to the object in the bucket that’s associated with the current AWS SFTP user. AWS SFTP implements this via what it calls a “scope-down” IAM policy. This is a simple policy that contains variables AWS SFTP passes at execution time to IAM to allow the policy to limit access to the correct object in the S3 bucket. This precisely mimics “home directories” in managed file transfer systems like Globalscape EFT and WS_FTP Server.
Here is a screenshot showing how to define a scope-down policy that limits the current user to a specific “subdirectory” (S3 object) in the S3 bucket, along with the JSON policy specified for that user. Note the variables in the JSON that resolve at policy check time to the bucket name and the home directory specified for the user in the AWS SFTP user configuration.
{
    "Version": "2012-10-17",
    "Statement": [
        {
            "Sid": "ListHomeDir",
            "Effect": "Allow",
            "Action": "s3:ListBucket",
            "Resource": "arn:aws:s3:::${transfer:HomeBucket}"
        },
        {
            "Sid": "AWSTransferRequirements",
            "Effect": "Allow",
            "Action": [
                "s3:ListAllMyBuckets",
                "s3:GetBucketLocation"
            ],
            "Resource": "*"
        },
        {
            "Sid": "HomeDirObjectAccess",
            "Effect": "Allow",
            "Action": [
                "s3:PutObject",
                "s3:GetObject",
                "s3:DeleteObjectVersion",
                "s3:DeleteObject",
                "s3:GetObjectVersion"
            ],
            "Resource": "arn:aws:s3:::${transfer:HomeDirectory}*"
        }
    ]
}
And here’s the result in FileZilla. We are able to connect to AWS SFTP using the user specified in IAM and are limited (“jailed”) to the folder specified for that user in the AWS SFTP console.
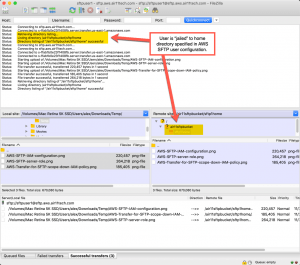
with FileZilla as transfer client (click to enlarge)
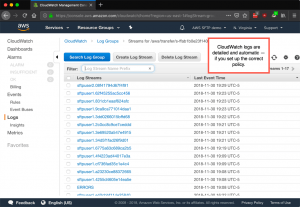
But wait! There’s more. As with any AWS service, integration with CloudWatch is automatic, providing detailed, actionable info. This is ideal for security conscious enterprises as everything about the transfer is logged. Trust me, you really want to integrate AWS SFTP and CloudWatch.
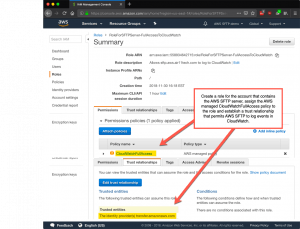
But think about it: how do we get AWS Transfer for SFTP to log events into CloudWatch for the account associated with the running AWS SFTP server? Answer: we need a role that establishes a trust relationship between the AWS SFTP server in this account and CloudWatch. This is exactly what we did above for the S3 bucket. Now that you’re expert at this, it’ll only take a minute to create a new role that permits AWS SFTP in this account to AssumeRole and assign an “all access” CloudWatch managed policy to the role. You can use the same JSON as above to create the trust relationship between this account and transfer.amazonaws.com, as shown here.
This produces that lovely CloudWatch output that your CISO requires.
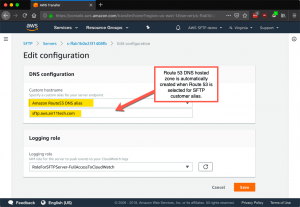
And finally, you may have noticed I am using a custom DNS name for the AWS SFTP server. You can select Route 53 to host the zone for this SFTP server. When you make the selection in the screenshot below, the zone is automatically created. If, like me, your DNS is registered elsewhere you can conveniently place the AWS SFTP servers in a subdomain of your domain by adding NS records in your base domain, using the Route 53 name servers as the target for the NS records. This makes Route 53 authoritative for the subdomain (here aws). I described how to do this over 4.5 years ago — and I still think this is a clever way to take advantage of Route 53 if you cannot otherwise migrate your entire DNS infrastructure to Route 53 DNS.
This is one of the more complex topics I’ve tacked and I hope it helps you. AWS Transfer SFTP is very appealing on many levels and I am sure if you try it, you’ll like it. If for no other reason, you should consider AWS Transfer for SFTP not least for the fact that’s it’s totally integrated into the AWS environment, meaning you can do things with it you’d never attempt with any other sftp server — like using Lambda to manage files on arrival and departure or S3 lifecycle policies on your buckets to archive files at low cost.
One final note: you’ll notice I didn’t obscure and names or account numbers. I did that so you could follow all the text, screenshots and code samples more easily. These resources have been deleted, so that the black hats among you have nothing to pwn.
I look forward to your comments and feedback.
Leave a Reply