 Have you ever run across a PowerShell cmdlet that produces really nice default console output in table format that you would like to save as a .csv file? You might think it’s as simple as piping the output to
 Export-Csv. And sometimes it is. But the cmdlet author determines what is output to the console. If that default output contains properties from nested objects returned by the cmdlet, you will have to access those nested objects to create a useful export to .csv.
That means you need to be comfortable with PowerShell objects. This post is an example of how to use PowerShell objects and PowerShell objects nested inside PowerShell objects.
Since objects can themselves contain collections of objects, it’s important to understand how to inspect object properties from the PowerShell console. While an .Net app developer might be quite comfortable with objects-within-objects, DevOps folks, administrators and cloud architects — the target audience for PowerShell — might not be.
Let’s walk through an example using Get-AzureRmVm. (Update 2024-04-28: the explanation here works just as well for the current Azure PowerShell modules as it did for the now-legacy AzureRm module.)
Follow this and you’ll get a “two-fer”. You’ll understand PowerShell objects better and you’ll be able to create a script to inventory your Azure VMs with any set of details you wish.
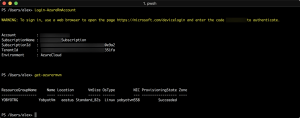
The Get-AzureRmVm Azure PowerShell cmdlet’s author decided to include information on the OS type and the sizes of the VMs. Here’s an example of the default response.
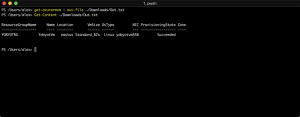
If you just want to save the console output, you can pipe the output of Get-AzureRmVm to Out-File, as shown here.
But if you pipe the output to Export-Csv, something else happens:
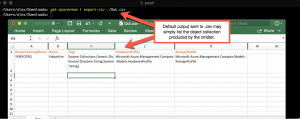
You end up with the name of an embedded object in the .csv file, not the actual data. What’s going on?
Before answering that question, allow me to introduce the most useful cmdlet in PowerShell: Get-Member. The doc simply says that this cmdlet “Gets the properties and methods of objects.” That’s quite an understatement. In my PowerShell work, I use gm (the alias for Get-Member) more than any other cmdlet, bar none. That’s because it’s a quick and handy way of discovering what objects are contained within higher level objects. Let’s use Get-Member with Get-AzureRmVm.
Piping the output of Get-AzureRmVm to Get-Member retrieves a collection of one of more objects of type Microsoft.Azure.Commands.Compute.Models.PSVirtualMachineList. This object contains properties that are themselves objects of varying types. Note in this screenshot that the properties HardwareProfile and StorageProfile are nested objects contained in the PSVirtualMachineList object.
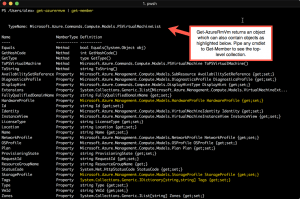
Now we can see why a simple piping of Get-AzureRmVm output to Export-Csv produces object type output for variables instead of the properties of those objects. It’s because we need to be specific about which properties of nested objects we want Export-Csv to use.
To work down the list of objects, we can simply pipe the nested object to Get-Member exactly the same way to see what its properties and methods are. I call this “PowerShell object sleuthing” and, while you can find the definitions of objects’ properties online, it’s just simpler and faster to use Get-Member. Here’s an example of discovering the properties of the StorageProfile object returned by Get-AzureRmVm. Notice that the object Microsoft.Azure.Management.Compute.Models.StorageProfile contains yet another object of type Microsoft.Azure.Management.Compute.Models.OSDisk. It’s this last object that contains a property (OsType) that we liked in the default console output and which we want to store in a .csv.
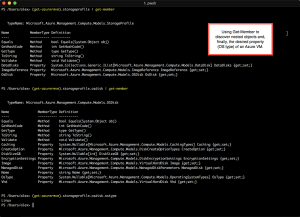
Now that we have discovered how to navigate the properties of nested PowerShell objects, we can write a simple script to retrieve those properties for each Azure VM and create a nicely formatted .csv.
Here’s an example PowerShell script that mimics the console output of Get-AzureRmVm. In this script, all VMs in a subscription are passed to the pipline where we retrieve and format properties we are interested in, add them to an [ordered] hash table and use that table as the properties of a custom PowerShell object which represents a row of output in our .csv. An array containing our custom objects is piped to Export-Csv, producing precisely the output we want.
    .SYNOPSIS
        Lists all VMs in an Azure subscription and creates an output .csv with selected properties of the VMs

    .EXAMPLE
        .ListAzureVms.ps1

    .NOTES
        Assumes pwsh session is logged in (Login-AzureRmAccount) and has selected the proper subscription (Select-AzurRmSubscription)

        Alex Neihaus 2018-05-18
        (c) 2018 Air11 Technology LLC -- licensed under the Apache OpenSource 2.0 license, https://opensource.org/licenses/Apache-2.0
        Licensed under the Apache License, Version 2.0 (the "License");
        you may not use this file except in compliance with the License.
        You may obtain a copy of the License at
        http://www.apache.org/licenses/LICENSE-2.0

        Unless required by applicable law or agreed to in writing, software
        distributed under the License is distributed on an "AS IS" BASIS,
        WITHOUT WARRANTIES OR CONDITIONS OF ANY KIND, either express or implied.
        See the License for the specific language governing permissions and
        limitations under the License.

        Author's blog: https://yobyot.com
#>
$objarray = @() # Create array to hold objects to be written to .csv
Get-AzureRmVM | `
ForEach-Object -Process { `
    $os = $($_.StorageProfile.OsDisk.OsType) # Retrieve OS VM is runing
    $vmsize = $($_.HardwareProfile.VmSize)
    $tags = $_.Tags | ForEach-Object -Process { [string]::Join(";", $_) } # "Flatten" the tags in the Tags object into a single column for export
    $hash = [ordered]@{
        "VmName"   = $_.Name;
        "VmSize"   = $vmsize;
        "ResourceGroup" = $_.ResourceGroupName;
        "Region"   = $_.Location;
        "OperatingSystem" = $os;
        "Tags"     = $tags;
    }
    $obj = New-Object -TypeName System.Management.Automation.PSObject -Property $hash # A PSObject cannot be [ordered], so create an ordered hash table then make a collection of them
    $objarray += $obj
}
$objarray | Sort-Object -Property VmName | Export-Csv "$HOMEDesktopVMsAsOf-$(Get-Date -format FileDateTime).csv" -NoTypeInformation
Now, you know how to find the properties you might want for an inventory of your Azure VMs and how to automatically produce that inventory.
I hope you find this useful. As always, comments are welcome.
Leave a Reply